write the music
Act Naturally
Write the music
Now that we have outlined the song from a lyrical perspective we need to create an outline from a musical perspective.
Use the bottom boxes of the song structure canvas to describe the feeling you want to create in each section. Try to capture it in a few descriptive words. The sensory writing exercise you did earlier may be useful to you here.
For example you might decide that you want your verses to create tension that the chorus will resolve. Do you want the section or whole song to sound dark and spooky or light and happy like a summers day. Do you want people to dance to the song or do you want them to be relaxed by it? Make sure that the feeling you want to evoke compliments the lyrical outline for the each section.
If you find this difficult, listen to songs that you like and think about they make you feel. How does the feeling of the verse support the message of their lyrics, how does the feeling change when they reach the pre-chorus.
Practise deconstructing songs in this way. Once you have analysed a few you should be able to describe your own.
Before we move on…
This recipe is focused on song writing and can’t cover all the musical topics required without expanding to become a full blown music course. We have tried to keep things simple and easy to do but you need to have access to a digital audio workstation (DAW) such as Garageband (free if you have a Mac) or Reaper (https://www.reaper.fm) which has a free trial and costs a $60 dollars for private individuals to use.
It’s really going to help if you:
- Have the ability to play a chordal instrument
- Are familiar with creating music using a digital audio workstation
- Know what major scale is and how to play it
- Understand what a key is and the basics of functional harmony
- Know the roman numeral system for identifying chords
If you don’t have these skills you can still follow the recipe but you might find it easier to partner with someone who does.
Sign up for free and let us know in the comments if you would like us to add recipes on each of these topics.
Start from scratch or write a contrafact
If you are new to songwriting and music you might wish to make things a little easier by writing a new melody over another songs chords. This is called writing a contrafact. In certain styles of music such as Jazz it’s a common thing to do. Doing this can be a great way to sharpen your melody and hook writing skills without having to start from zero.
If you want to write a contrafact find a song that has a similar feel to the one you are going for. In most cases you will be able to look up the chords online. Play them on your instrument or plug them into your digital audio workstation. You will be able to follow the rest of this recipe and simply skip sections that no longer apply.
Establish the basics
The next step is to define some essentials for your song. Remember each of these musical choices will influence what your audience feels.
Pick a tempo
If you want people to dance choose a tempo between 117 and 126 BPM. If your song is a sad ballad, select a slower tempo to evoke this feeling. Songs faster than 126 BPM are common in certain styles of music like speed metal and EDM.
Pick a key and a mode
If you are writing a contrafact use the key of the song where you are borrowing the chords from.
If you are uncertain choose A major.
If you have a deeper understanding of scales and modes feel free to mix things up to create different feelings
Pick time signature
4/4 is called common time for a reason. You might want to start out with 4/4 but don’t be scared to add in bars of other time signatures or to mix things up.
If you are writing a contrafact you can use the time signature of the song where you are borrowing the chords from.
Chords first?
Next we are going to dive straight into writing chord progressions for each section of your song. We are starting there in order to make this recipe coherent. As you become more experienced feel free to experiment with writing melodies or rhythms first. There are no rules and each element you decide upon influences the others.
Find chords for each section
NB: Skip this activity if you are writing a contrafact.
Chords and harmony are a key component in creating the feel of your song. You need to find a sequence of them for each section of your song. You can use the same ones throughout the song or vary them. Understanding how harmony works is a very deep topic. This recipe will give you just enough to find and choose some chords.
Keep the feeling you want to create in mind as you make your choices. Refer to the song structure canvas and ask yourself if the sequence of chords you are hearing fits the feeling you are after.
Use one of the three methods below to create a chord progression for each section of your song.
Enter or import the chords you have chosen into the digital audio workstation. Make sure each section matches the number of bars defined in the song layout section above. If in doubt add the chords on the beat at the beginning of each bar. Feel free to play around with other rhythms. Keep in mind the feel you want to create. We will discuss rhythm later in the recipe.
1. Use standard progressions
It’s good to remember that you don’t need to know everything about harmony to get started. If in doubt use one of our standard chord progressions. Play with them. Feel free to change them, mix them up and swap chords out of them. Listen to the feeling they create and use them like colours in a paint box. Using these progressions alone could provide enough songs for a whole career. Here’s a short list of winning progressions:
I, V, vi
IV, I, V, vi
IV, I6, ii
I, ii, vi, IV
I, iii, vi, IV
I, V, vi, IV
I, V, ii, IV
ii, IV, I, V
I, V, ii, IV
I, VI, ii V
iii, VI, ii, V
ii, V, I(4), iv
2. Generate chords with software
You can use tools like chordchord.com to automagically generate a chord progression. You can then export/import those that you like into your digital audio workstation. This is a great way to spark your creativity but keep in mind the guidance above. Tools like this one can lead you in new and unexpected directions but you must decide if the result expresses your musical idea.
3. Use this chart to build your own progressions
If you haven’t studied music theory it can be hard to know where to start. This chart makes it easy to create progressions that sound consonant (smooth).
It’s based on what theorists call functional harmony, thats the idea that chords in a key have different jobs to do. There are three types of job or function.
Tonic function chords create a feeling of rest, they make it feel like the progression has returned “home”.
Sub-dominant function chords create the feeling that the music is going somewhere.
Dominant function chords point back to the Tonic or back “home”.
We can make a set of chords from the notes in a scale. We say that these chords are “in the key”. We label all the chords in the key with roman numerals to make it easier to compare progressions between keys. If the roman numerals are uppercase the chord is major if they are lower case the chord is minor. This is called roman numeral system. Here are all the three note (triads) and four note chords (sevenths) in the key of A major with their Nashville numbers and the notes they are made of.
I – A major, A major seventh (Amaj, Amaj7)
ii – B minor, B minor seventh (Bm, Bm7)
iii – C sharp minor, C# minor seventh (C#m, C#m7)
IV – D major, D major seventh (D, Dmaj 7)
V – E major, E dominant seventh (E, E7)
vi – F sharp minor, F# minor seventh (F#m, F#m7)
vii° – G# diminished, G# minor seventh flat five (G#°, G#m7b5)
You can look up how to play them on a piano here http://www.piano-keyboard-guide.com/key-of-a.html.
How to use the chart
Start with any chord on the chart and move to the right as much as you wish. Only move left along the arrows. This will create progressions that sound “smooth”. Notice how the musical phrase feels completed when you travel along one of the arrows.
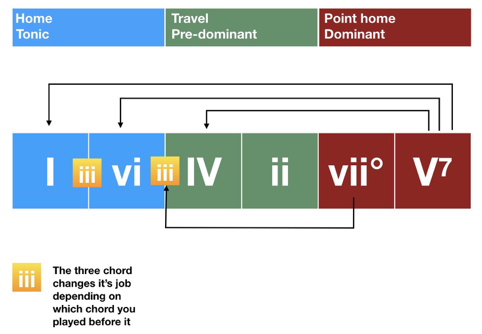
The iii (minor three) chord is a chameleon. It can do different jobs. If you play it after a I (One) chord it will sound at rest. If you play it after a vii° (dim seven) chord it will sound sub-dominant.
Create your melodies
Follow these steps to build melodies for each section of your song. Try to create contrast between the sections and make sure the melody matches the intended feel of the section. As you do these steps enter the melody into your digital audio workstation.
1. Start with melodic rhythm
A large part of what moves us in a melody is it’s rhythm. Listen to some melodies you like and clap out the melodic rhythm. This will give you an idea of the type of thing that works.
Clap out a rhythm of your own along with your chords. Experiment until you find something you like. Remember to keep it simple, the song needs to be easy to sing.
Melodic rhythm is a good place to start because building a melody rhythm up rather than from notes and intervals down tends to produce hookier results. Rhythm is fundamental.
2. Add pitches
Make sure you sing the melody you are creating as you add pitches and intervals to your melody. It’s important that your melody stays within most peoples comfortable vocal range (also know as the Tessitura). Keep singing the melody as it evolves. Add notes and phrases from the key of your song. Use any note from the scale in any order you like. Pay attention to how some notes seem to “rub” against the chords more than others.
If you are in the key of A Major the notes in that key are as follows: A, B, C#, D, E, F#, G#, A. They look like this on a keyboard.
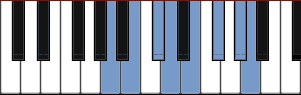
You can look up the notes for other keys here https://www.pianoscales.org/major.html.
3. Shape/contour
Decide on the shape of your melody. There are 6 basic melody shapes. Linear, ascending, descending, arch, inverted arch or zigzag. It’s useful to think about the overall shape of your melody. One way of writing melodies is to draw a curve or contour line on a piece of paper and then enter that into a piano roll editor in your digital audio workstation. <make it obvs what to do>
4. Decide how your melody moves
A melody can move in one of four ways:
Static
Where the melody sticks to one note or almost one note. This puts the focus on the rhythm of the words and can make it easier to deliver more words than the other forms
Step
A melody that moves up or down the scale playing each note. This feels controlled and connected but small and limited
Skips
Moving by anything larger than a step, feels more open and free. I think of skips as thirds and fourth but that’s just my system. The barrier between skips and leaps isn’t well defined.
Leaps
Anything larger than a perfect 4th interval. Moving in leaps tends to feel powerful and energetic.
Often sections of a song move in contrasting ways. If the verse is largely static then the chorus is likely to move by step or leap. A single motif can use more than one type of motion however. Over the rainbow leaps up an octave and then slowly comes back down to earth using steps.
5. Follow or avoid root notes of chords
Chords are made by picking a note from the scale and adding other notes on top.
If you are using the well known one, five, six, four (I, V, vi, IV) progression in A Major. The chords are A major (I), E major (V), F minor (vi), D Major (IV). If our melody plays the root note at the same time as the chord the melody is following the roots.
Following roots tends to feel heavy, simple and stable. It feels unsophisticated but resolved.
Choosing other notes from the chord or other notes from the scale can create a wide range of other feelings.
6. Ensure the melodies can be sung
You should now have singable melodies along side the chords for each section of your song. Sing (la la) along with the track to ensure that they work and aren’t too busy. In general the verses should have more/shorter notes and be more dense than the choruses. This will enable you to get more lyrical content across in these sections. Let’s move on and add some lyrics. Once they are in place you will revisit the musical element later in this recipe. So don’t worry about making things too perfect at this stage.
Now what?
Now you have the chords and melody in place it’s time to turn ideas into real lyrics.